
The control starts up in Incremental jog mode. In order to jog the axes in continuous movement, you need to press the INCR/CONT key to switch from incremental to continuous jog mode.
|
The control starts up in Incremental jog mode. In order to jog the axes in continuous movement, you need to press the INCR/CONT key to switch from incremental to continuous jog mode. |
The work light can be turned on and off with its built-in switch any time the control's main power is on.
 You can insert and remove tools by hand when needed, using the Tool Eject
button on the front of the head.
You can insert and remove tools by hand when needed, using the Tool Eject
button on the front of the head.
The A axis is a full fourth axis, capable of simultaneous interpolation and indexing to any angle.
It has a pneumatic clamp system which can provide extra holding torque for heavy machining operations away from centerline.
You can unclamp and clamp the rotary table using the M11 and M10 codes, either in a program or at the MDI prompt.
| M11 | Unclamp the rotary table |
| M10 | Clamp the rotary table |
Program example:
G91 G28 Z0
G90
M11
G0 A0
M10
M98 P1234 ; cut features on top face of part
G91 G28 Z0
G90
M11
G0 A180
M10
M98 P2345 ; cut features on bottom face of part
...
The rotary table will automatically be unclamped (M10 cancelled) at the end of the program cycle.
For further information about rotary table setup, operation and programming, see http://www.cncsnw.com/4thHowTo.htm
To perform an automatic tool change use the M6 code, either in a program or at the MDI prompt.
E.g.
M6 T9
will put away whatever tool is in the spindle and will load tool #9.
You can also change tools using the F7/ATC option on the Setup, Offset Library, and Tool Library screens. On those screens, press F7/ATC; enter the tool number you wish to load; and press CYCLE START.
There are 200 tool entries available in the control's Tool and Offset Libraries. There are 22 stations ("bins") available in the machine's tool carousel. You can assign carousel bin numbers, from 1 to 22, to any tools in the Tool Library (F1/Setup, F2/Tool, F2/Tools).
For example, if you specify that tool 52 is in carousel bin 12, then when your program calls for T52, the machine will load the tool from bin 12.
You can assign more than one tool to a carousel bin. You must always verify that the correct physical tools are in the carousel when you start a job running.
You cannot change the bin assignment for the tool that is presently in the spindle. If this is necessary, put it away first by using M6 with a different tool number. Once the tool is back in the carousel you can change its bin assignment (and move it by hand). If you wish, you can manually remove the tool from the spindle before telling the control to put it away in the carousel and load a new tool. This will leave the carousel bin empty.
As the machine runs and changes tools, it will always put away the old tool in its original carousel bin, before rotating to the new tool.
You can save a little time by inserting an M17 code at the end of a tool's final cut, just before the tool change. M17 will shut off the spindle and coolant, then start the spindle orientation process.
For example:
M6 T1
M3 S2000
G0 X-1 Y0 Z.1 G43 H1
G1 ...
...
G0 Z.1
M17
M6 T2
M3 S1400
G0 X0 Y-1 Z.1 G43 H2
G81 ...
...
... G80
M17
M6 T3
M3 S2500
G0 X0 Y0 Z.1 G43 H3
...
G49 M25
Intercon will include M17 automatically when it posts programs on the control. The above hints are useful when you are hand-writing G code programs or configuring offline CAD/CAM software.
 When no tool change or other automatic cycle is in progress, you can
manually jog the tool carousel forward and back using the "INDEX +" and
"INDEX -" Aux keys on the jog panel, or the black "INDEX CAROUSEL" button
on the front of the machine head.
When no tool change or other automatic cycle is in progress, you can
manually jog the tool carousel forward and back using the "INDEX +" and
"INDEX -" Aux keys on the jog panel, or the black "INDEX CAROUSEL" button
on the front of the machine head.
Within a program cycle, you can index the carousel plus and minus using the M50 and M51 codes. These codes may be used to rotate an especially long tool away from the work area while working. M50 and M51 will not affect subsequent tool changes: the next tool change will rotate as needed to return the carousel to the put-away position for the current tool (the bin that it came from)
| M6 T__ | Do a complete tool change |
| M17 | Prep for tool change: start spindle orient |
| M19 | Orient spindle |
| M50 | Rotate carousel forward (+) one position |
| M51 | Rotate carousel backward (-) one position |
In rare cases it may be necessary to operate the tool changer components manually. You can do this with provided M functions, while holding down the Aux12 key.

Aux12 is the blank gray key in the rightmost column of Aux keys.
| M15* | Unclamp tool |
| M16* | Clamp tool |
| M18 | Reset carousel position: current position = T1 (Aux12 key is not required for M18) |
| M80* | Advance tool carousel (in under spindle) |
| M81* | Retract tool carousel (back out of the way) |
* These functions are for emergency operation only, and require that you hold down the Aux12 key while executing them.
If you have any doubt about whether the tool changer is in a known state (for example, if a fault occurred during a tool change), you should use the above Maintenance Mode controls to establish the following conditions:
Then use the F3/MDI prompt to enter:
M18
and press CYCLE START. This will set the carousel to tool 1, and indicate that tool 1 is in the spindle.
The following items should be done on a weekly basis:
See the Bridgeport Torq-Cut maintenance manual for detailed maintenance procedures.
Most servo drive parameters are set to factory defaults.
The following parameters are set to values other than factory defaults:
| Parameter | Value | Meaning |
| Cn-01 | Bits 2, 3 and 7 set: Ignore P-OT and N-OT; maintain dynamic brake on base-block | |
| Cn-02 | Bit 0 set: Reverse rotation mode | |
| Cn-03 | 333 RPM/V | Speed reference gain |
| Cn-04 | X: 60 Hz Y: 90 Hz Z: 60 Hz |
Speed loop gain |
| Cn-11 | 8192 | Motor encoder cycles/revolution |
| Cn-0A | 8192 | Buffered encoder output cycles/revolution |
See the Yaskawa SDGB (Sigma I) Series User's Manual for detailed information on these and other servo drive parameters.
Most spindle drive parameters are set to factory defaults. The following parameters are set to values other than factory defaults:
| Parameter | Value | Meaning |
| C1-10 | 2.0 | Accel/Decel time (s) |
| C1-12 | 1.00 | Motor speed adjustment value (reference gain tuning) |
| C1-27 | 1.00 | Transmission ratio in high gear range |
| C1-36 | 00001000 | Bit 3 set: 1CN-40 selects servo mode (SV) instead of SSC |
| C1-37 | 00001000 | Bit 3 set: Keep MC on after deceleration to stop |
| C1-39 | 0 | Orient using encoder |
| C2-01 | 268 | Spindle orient position (pulses away from index) |
| C2-09 | 005 | Orientation in-position window (pulses for initial detection) |
| C2-10 | 020 | Orientation loss-of-position window (pulses before report loss of orient) |
| C2-11 | 400 RPM | Orientation speed |
See the Yaskawa VS626-VM3C Instruction Manual for detailed information on these and other spindle drive parameters.
If the spindle belt or spindle encoder is removed and reinstalled, then it will be necessary to reset the orient position. You do this by manually turning the spindle to the desired orient position; reading the encoder position from V2-03 of the status display; and entering that position into parameter C2-01.
The PLC program can generate various fault messages, in addition to those listed in the Centroid operator's manual.
You can use the PLC Diagnostic display on the console to view some of the Centroid PLC input and memory locations mentioned with these fault conditions. At the control's main screen, press Alt-I to activate the PLC Diagnostic display. Press Alt-I again to dismiss it.
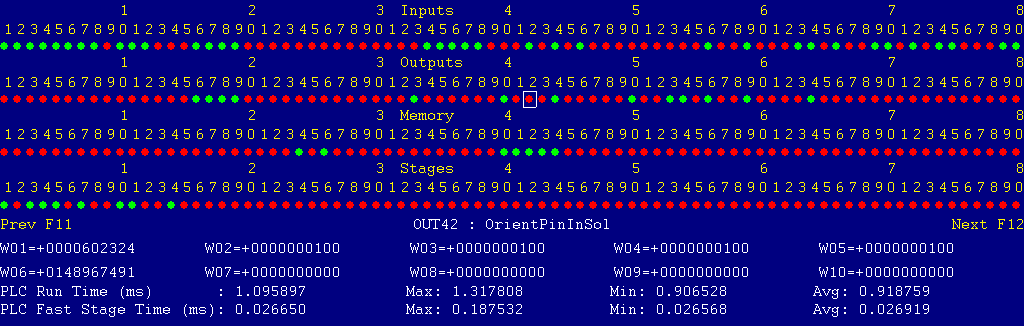
Each page of the Diagnostic display shows four rows of red and green dots: the first row shows PLC inputs 1 through 80; the second row PLC outputs 1 through 80; the third row PLC memory bits 1 through 80; and the fourth row PLC program stages 1 through 80.
You can use the arrow keys to move a highlight box over any of these locations. The name of the highlighted location will be displayed in the center of the screen below the red and green dots.
For example, in the illustration above the highlight box is on Output #42: The dot below the 2, to the right of the superscript 4, on the second line.
Below the four rows of bit status information are ten numeric ("word") variable values, labeled W1 through W10. Some of these variables also hold useful status information, described with the error and fault conditions to follow.
There are multiple pages of Diagnostic data. With the Alt-I diagnostic display showing, you can use the F12 and F11 keys to scroll right and left. For example, pressing F12 once will shift to the page showing inputs and outputs 81 through 160, and word variables W11 through W20.
Messages with 9000-series message numbers are Faults. After resolving the problem, you must press and release the Emergency Stop button to clear a Fault.
Messages with 8000-series message numbers are Errors. Errors will cancel the program cycle and stop the spindle and coolant, but they do not then need to be explicitly reset.
Messages with 5000-series and 2000-series message numbers are Warnings and Informational Messages. They do not cancel the cycle or require any action to reset.
The control detected an internal error in processing the PLC logic program.
Report this error to your dealer, along with the values from W14 and W15. Also report what function the machine was performing when the fault occurred.
You must shut down and cycle the power to clear this fault.
References:
PLC W14: Copy of internal SV_PLC_FAULT_STATUS, indicating the type of problem
PLC W15: Copy of internal SV_PLC_FAULT_ADDRESS, indicating the location of the problem
The MPU11 motion controller detected loss of fiber optic communication from the GPIO4D interface unit.
Check the optical fibers. Verify that they have not been bent, kinked, or pulled loose from their sockets. Verify that they are both plugged into the correct sockets (1 to 1 and 3 to 3, on both boards).
References:
Schematic: Lines 55, 59
The GPIO4D interface unit reported back to the MPU11 motion controller a loss of fiber optic communication from the MPU11. This indicates that Fiber 3 is functioning normally, but Fiber 1 may have problems.
Check the optical fibers. Verify that they have not been bent, kinked, or pulled loose from their sockets. Verify that they are both plugged into the correct sockets (1 to 1 and 3 to 3, on both boards).
References:
Schematic: Lines 55, 59
One or more of the Yaskawa servo drives is reporting a fault condition.
Check the LED displays on the axis drives themselves for a fault code.
Press and release Emergency Stop to clear the fault.
References:
PLC INP17: indicates X servo drive alarm state.  Green = closed = okay, Red = open = fault
PLC INP18: indicates Y servo drive alarm state.  Green = closed = okay, Red = open = fault
PLC INP19: indicates Z servo drive alarm state.  Green = closed = okay, Red = open = fault
PLC INP20: indicates A servo drive alarm state.  Green = closed = okay, Red = open = fault
Schematic: Lines 31, 36, 41, 46, 61, 63, 65, 67
The spindle drive unit is reporting a fault condition.
If possible, check the LED display on the spindle drive itself for a fault code. However, because the fault condition opens the emergency stop contactor SPNCR, cutting off AC power to the spindle drive, you only have about 8 seconds to see the fault display before the spindle drive's screen goes blank.
After you reset the fault and restore power, you can recall the error condition using the digital keypad on the spindle drive. See chapter 7 of the Yaskawa 626VM3C Instruction Manual for the procedure.
Press and release Emergency Stop to clear the fault.
References:
PLC INP38: indicates spindle drive alarm state.  Green = closed = okay, Red = open = fault
Schematic: Lines 7, 89
The MPU11 motion controller detected loss of communication from the operator panel in the console.
Check for damage or disturbance to the cable between the back of the panel in the console, through the machine chases to the MPU11 board in the cabinet.
Press and release Emergency Stop to clear the fault.
References:
Schematic: Lines 50, 55
The operator panel in the console reported back to the MPU11 motion controller a loss of communication from the MPU11. This indicates the outgoing signal in the jog panel cable is functioning normally, but the return signal may have problems.
Check for damage or disturbance to the cable between the back of the panel in the console, through the machine chases to the MPU11 board in the cabinet.
Press and release Emergency Stop to clear the fault.
References:
Schematic: Lines 50, 55
You attempted to start the spindle running, or orient the spindle, with the DP-4 touch probe plugged in.
Remove the probe from the spindle and unplug the cord from the probe.
Press and release Emergency Stop to clear the fault.
References:
PLC INP771: indicates presence of touch probe.  Green = closed = probe plugged in, Red = open = no probe
Schematic: Line 56
The way lube tank is low on oil, and no program cycle is in progress.
Refill, then press and release Emergency Stop to clear the fault.
References:
PLC INP8: indicates lube float switch state.  Green = closed = okay, Red = open = level low
Schematic: Line 80
During a jogging move the DP4 probe was tripped. The machine stops in order to prevent damage to the probe.
References:
PLC INP769: indicates probe trip state.  Green = closed = probe tripped, Red = open = not tripped
Schematic: Line 56
You exited the CNCM control software without first pressing Emergency Stop.
One of the spindle accessory overload relays tripped: either MOL1, for the spindle motor cooling fan; or MOL2, for the spindle braking resistor.
Press the blue RESET button on the affected overload relay to reset the trip, then press and release Emergency Stop to clear the fault.
References:
PLC INP40: indicates overloads state.  Green = closed = okay, Red = open = one or both tripped
Schematic: Lines 4, 10, 90
The PLCADD1616 expansion board has failed to communicate properly with the GPIO4D board.
Check the gray PLC expansion cable that connects the PLCADD1616 board to the header near the right edge of the GPIO4D board. Check for green 5V power and "PLC OK" LED indicators on the PLCADD1616 board.
The PLC program requested display of an error message, but provided an invalid message code. Notify your dealer.
At the start of a tool change, the PLC found that the CNC macro had not removed a previous head-up acknowledge signal. All acknowledge signals need to be clear before a new tool change cycle can begin.
At the start of a tool change, the PLC found that the CNC macro had not removed a previous head-down acknowledge signal. All acknowledge signals need to be clear before a new tool change cycle can begin.
At the start of a tool change, the PLC found that the tool carousel out sensor was not closed to indicate that the carousel was fully retracted.
Check the carousel position; check for obstructions that might be preventing it from fully retracting; try an M80/M81 cycle.
At the start of a tool change, the PLC found that the tool carousel in sensor was closed, indicating that the carousel was in under the spindle.
Check the carousel position; retract with M81 if needed.
At the start of a tool change, the PLC found that the tool-clamped switch was not closed to indicate that the tool was fully clamped.
Check the drawbar; verify the current tool is fully seated; try removing and reinserting the tool. Check the drawbar position switches on top of the head.
At the start of a tool change, the PLC found that the tool-unclamped switch was closed, indicating that the drawbar was open.
Check the drawbar; verify the current tool is fully seated; try removing and reinserting the tool. Check the drawbar position switches on top of the head.
At the start of a tool change, the PLC found that the tool-counter sensor was not closed to indicate that the carousel was centered on a valid tool position.
Check the carousel position. Try using the manual Tool Index buttons to move it to the next position and back.
The CNC software requested carousel rotation to an invalid tool position (not between 1 and 22).
This is probably due to an error in the Tool Library information. Look for invalid bin numbers in the tool library (most likely for the tool you just asked for when the error occurred).
If necessary, use the "ATC Init" feature on the Configuration screen to reset the tool library bin numbers.
References:
PLC W10: indicates requested bin number (from CNC program, via Tool Library)
PLC W19: indicates maximum allowed bin number (from Parameter 161)
Schematic: Lines 4, 10, 90
The stages of the automatic tool change sequence test for many different error conditions. In general, each stage performs one action in the sequence -- e.g. orient the spindle, advance the carousel, unclamp the tool, raise the head -- then waits for completion of that action, then moves on to the next stage. If the action is not completed within a reasonable period of time, then one of the "91xx ATC ... TIMEOUT" faults will be raised.
However, the stages are not just waiting for completion of the action at hand. Before advancing to the next stage, they also require that most other ATC states have remained in the correct condition.
For example, while advancing the tool carousel in to the spindle, to pick up the old tool, "ATCCarInStage" not only checks to see if the "ToolArmAdvanced" sensor input has closed, but it also checks that the M6 request has been maintained; that the drawbar clamp has remained closed and not opened; that spindle orientation has been maintained; etc..
As a result, if the intended action takes place (e.g. the carousel advances to its forward stop), but at the same time some other condition is lost (e.g. the tool-clamped switch signal opens due to a faulty connection) then the stage will time out while waiting for all conditions to be met. The fault message may read "9113 ATC CAR IN TIMEOUT" even though the real problem is with the tool-clamped switch wiring.
Problems like this can be identified through the use of the PLC Detective logic analyzer (described later in this document), or by viewing the PLC word variable W26 "ATCStatus_W" after the fault occurs. When an ATC fault occurs, the PLC program encodes the status of most ATC inputs and flags, as a binary pattern, in W26.
See the table, later in this document, to decode the value in W26.
During an automatic tool change, the spindle drive failed to orient the spindle and report completion within the allowed time.
During an automatic tool change, while advancing the carousel arm in to the spindle, the arm-advanced sensor (INP14) closed too soon: in less time than the motor should have needed to move the arm in. This may be a sign of electrical noise interfering with the sensor signal, or of a faulty sensor.
During an automatic tool change, while advancing the carousel arm in to the spindle, the orient-completion signal was lost for more than the allowable interval. This means that the spindle may have been allowed to rotate out of orientation.
During an automatic tool change, while attempting to advance the carousel to the spindle, the ATC sensors did not indicate the expected state within the allowable time.
This may be because the carousel itself failed to advance, or failed to move its full stroke. It might also be because one of the other ATC sensors (e.g. drawbar clamped and unclamped sensors, tool counter sensor, etc.) was not in the correct condition.
References:
PLC OUT37: powers carousel motor forward (advance)
PLC INP14: carousel-advanced sensor: Green = closed = carousel advanced, Red = open = not advanced
Schematic: Lines 83, 127
During an automatic tool change, the carousel moved to its "advanced" sensor, but a short time later either that sensor had opened again, or one of the other ATC sensors lost its correct state.
References:
PLC OUT37: powers carousel motor forward (advance)
PLC INP14: carousel-advanced sensor: Green = closed = carousel advanced, Red = open = not advanced
Schematic: Lines 83, 127
During an automatic tool change, either the drawbar failed to unclamp the tool within the allowed time, or one of the other ATC sensors lost its correct state.
References:
PLC OUT43: powers tool-release solenoid
PLC INP12: tool-unclamped switch: Green = closed = tool unclamped, Red = open = not unclamped
Schematic: Lines 82, 133
During an automatic tool change, while moving the head up off of the old tool, the tool-unclamped switch failed to remain closed. This could indicate a pneumatic problem (pinched or broken line), or failure of the tool-release solenoid valve.
References:
PLC INP12: tool-unclamped switch: Green = closed = tool unclamped, Red = open = not unclamped
Schematic: Lines 82
During an automatic tool change, while moving the head up off of the old tool, the tool-clamped switch failed to remain open. This could indicate a pneumatic problem (pinched or broken line), or failure of the tool-release solenoid valve.
References:
PLC INP11: tool-clamped switch: Green = closed = tool clamped, Red = open = not clamped
Schematic: Lines 82
During an automatic tool change, the M6 macro failed to move the head up to the clearance level above the carousel within the allowed time, or one of the other ATC sensors lost its correct state.
During tool carousel rotation, the tool counter sensor (INP15) opened too soon when moving away from a tool pocket: in less time than the motor should have needed to rotate the necessary distance. This may be a sign of electrical noise interfering with the sensor, which could in turn lead to an incorrect count and incorrect carousel position.
During tool carousel rotation, the tool counter sensor (INP15) failed to open in the required time, when moving out of one tool pocket toward the next.
This may be because the tool carousel is not rotating at all for some reason; or because of a failure of the tool counter sensor; or because one of the other ATC signals has lost its correct state.
During tool carousel rotation, the tool counter sensor (INP15) closed too soon when moving into the next tool pocket: in less time than the motor should have needed to rotate the necessary distance. This may be a sign of electrical noise interfering with the sensor, which could in turn lead to an incorrect count and incorrect carousel position.
During tool carousel rotation, the tool counter sensor (INP15) failed to close in the required time, when moving into the next tool pocket.
This may be because the tool carousel is not rotating at all for some reason; or because of a failure of the tool counter sensor; or because one of the other ATC signals has lost its correct state.
During an automatic tool change, the M6 macro failed to move the head back down to the carousel level within the allowed time, or one of the other ATC sensors lost its correct state.
During an automatic tool change, while waiting for the M6 macro to move the head back down to the carousel level, the tool-unclamped switch (INP12) failed to remain closed.
During an automatic tool change, while waiting for the M6 macro to move the head back down to the carousel level, the tool-clamped switch (INP11) failed to remain open.
During an automatic tool change, the drawbar failed to clamp the tool within the required time, or one of the other ATC sensors lost its correct state.
During an automatic tool change, while retracting the carousel arm back out to its parked position, the arm-retracted sensor (INP13) closed too soon: in less time than the motor should have needed to move the arm out. This may be a sign of electrical noise interfering with the sensor signal, or of a faulty sensor.
During an automatic tool change, while attempting to retract the carousel arm back to its parked position, the ATC sensors did not indicate the expected state within the allowable time.
This may be because the carousel itself failed to retract, or failed to move its full stroke. It might also be because one of the other ATC sensors (e.g. drawbar clamped and unclamped sensors, tool counter sensor, etc.) was not in the correct condition.
References:
PLC OUT36: powers carousel motor reverse (retract)
PLC INP13: carousel-retracted sensor: Green = closed = carousel retracted, Red = open = not retracted
Schematic: Lines 83, 126
During an automatic tool change, the carousel returned to its "retracted" sensor, but a short time later either that sensor had opened again, or one of the other ATC sensors lost its correct state.
References:
PLC OUT36: powers carousel motor reverse (retract)
PLC INP13: carousel-retracted sensor: Green = closed = carousel retracted, Red = open = not retracted
Schematic: Lines 83, 126
Upon completion of an automatic tool change, the M6 macro failed to remove the M6 request within the allowable time.
During an automatic tool change, while re-checking that the carousel arm is at the spindle, the orient-completion signal was lost for more than the allowable interval. This means that the spindle may have been allowed to rotate out of orientation.
During an automatic tool change, pressure switch PS1 was not closed to indicate adequate system air pressure.
Verify that air is connected, the shutoff is open, and the regulator is showing adequate pressure.
Press and release Emergency Stop to clear the fault.
The programmed RPM (S code) is less than the machine's minimum possible running RPM.
Check your program and enter a workable spindle speed.
The way lube tank is low on oil, but a program cycle is in progress. The current cycle will continue to run. If the level is still low when the cycle is finished, then a "9036 LUBE FAULT" condition will be reported.
Refill the lube tank.
References:
PLC INP8: indicates lube float switch state.  Green = closed = okay, Red = open = level low
Schematic: Line 80
A previous PLC fiber communication fault (9022 or 9023) has been fixed and cleared.
You pressed a keyboard shortcut key for jogging the machine or starting a cycle, but those shortcuts have been disabled on this control.
A previous fault condition has been cleared by pressing Emergency Stop.
An additional diagnostic tool, called PLC Detective, is included on the control. Among other functions, it includes a logic analyzer which can be used to record the status and changes in PLC inputs, outputs, and internal flags.
To launch PLC Detective:
There is a pre-configured logic analyzer setup stored on the control, designed for troubleshooting ATC errors. To load that setup file:
The logic analyzer requires a trigger condition. The ATC troubleshooting setup triggers when a tool change fault occurs (rising edge of memory bit ATCFault_M). When the trigger condition occurs, the logic analyzer will store the predetermined number of events from before and after the trigger, then return to an idle state.
To "arm" the trigger, press F1/Start. The F1 box will turn Red, indicating that the logic analyzer is waiting for the trigger event. I/O changes will be displayed on the screen as they occur.
When the trigger event occurs, the F1 box will turn Yellow, indicating that the logic analyzer is storing data. Once it has collected the remaining post-trigger events, it will automatically return to the idle state (F1 box returns to gray)
You can cancel a collection prematurely by pressing the F1 key a second time.
With the logic analyzer set up and the trigger armed, you can use Alt-Tab to switch back to the CNC11 window (hold down the Alt key and press Tab twice, to skip past the open command prompt window and select CNC11). Proceed with normal machine operations.
If and when the problem event occurs, you can use Alt-Tab to return to the PLC Detective window; view the results; and if desired, save the results in a text file.
Press F11/Save to save the logic analyzer configuration and the collected data. Enter a filename: either the same name you loaded before (if you want to replace it with the new results) or a new name. I recommend starting the name with "plcd", and ending it with a ".txt" extension. The ".txt" extension ensures that the data file will be included in any subsequent Report you take from the control.
The PLC Detective logic analyzer interface also has features which allow you to scroll through the collected data; to place time markers (using the right and left mouse buttons; and to see the time difference between selected events.
| Name | PLC Bit | Value in W26 | Meaning |
|---|---|---|---|
| M6 | SV_M94_M95_6 | 1 | Tool-change request from CNC macro |
| M19 | SV_M94_M95_11 | 2 | Spindle orient request from CNC macro or PLC |
| MZ_ACK | SV_M94_M95_8 | 4 | First head-at-carousel acknowledge from CNC macro |
| HU_ACK | SV_M94_M95_9 | 8 | Head-at-clearance acknowledge from CNC macro |
| HD_ACK | SV_M94_M95_16 | 16 | Second head-at-carousel acknowledge from CNC macro |
| ToolArmRetracted | INP13 | 32 | Carousel-out sensor |
| ToolArmAdvanced | INP14 | 64 | Carousel-in sensor |
| ToolClamped | INP11 | 128 | Drawbar-clamped switch |
| ToolUnclamped | INP12 | 256 | Drawbar-unclamped switch |
| ToolCounter | INP15 | 512 | Carousel rotation sensor |
| OrientComplete | INP41 | 1024 | Orient completion signal from spindle drive |
| OrientComplete_M | MEM74 | 2048 | PLC timed orient completion flag |
| AirPressureOk | INP5 | 4096 | Air supply pressure switch |
| MZ_Req | MEM69 | 8192 | PLC first request for macro to move Z to carousel level |
| HU_Req | MEM71 | 16384 | PLC request for macro to move Z to clearance |
| HD_Req | MEM72 | 32768 | PLC second request for macro to move Z to carousel level |
| END_Req | MEM70 | 65536 | PLC signal to macro that tool change is done |
| ArmMotorAdvance | OUT37 | 131072 | Drive arm motor forward (to advance carousel) |
| ArmMotorRetract | OUT36 | 262144 | Drive arm motor reverse (to retract carousel) |